Sources and Light Stage
ETIQUETTE
Using light sources raises a safety issue, as does the use of sharpened pencils, scissors, monkey bars and any significant source of heat. Appropriate behavior with Light is exactly the same as for a sharpened pencil. Do not wave it in or aim it at anyone's face, including your own and especially not at anyone's eyes. If you are seen doing this you will lose the option of using a pencil or a light for an indefinite time.
Don't stare at the sun either.
Don't put a golden unit bead in your mouth and don't lick a nine volt battery.
SOURCES
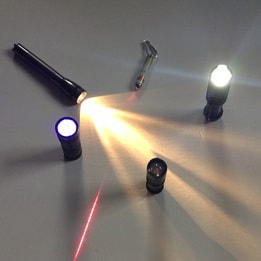
Sunlight, of course, is the most effective, if sometimes blunt, source of light in terms of producing a visible spectrum, shadows, exposed film images, infrared images and heat. The limitations are that direct sunlight is not always available and at times is too much light. Using only the sun as a source means the child cannot manipulate the source itself. She can move the lenses and mirrors and filters but she cannot move the sun. So the idea is to provide a number of flashlights, keeping both cost and power down, that emit light at different parts of the spectrum: infrared, ultraviolet and visible with visible being both LED and incandescent. Add to these a cat toy red laser to provide the opportunity to perceive and control a coherent beam of light. Finally provide a set of red, green, blue led sources.
It is interesting to note that the led source at the right of the two top images is producing three white beams. These are reflections off of the three pronged bezel that frames the lens. This will be useful in the chapter concerning Heat as the led light itself will not leave a heat footprint on liquid crystal film but the bezel will having been warmed by the batteries discharging.
|
|
|
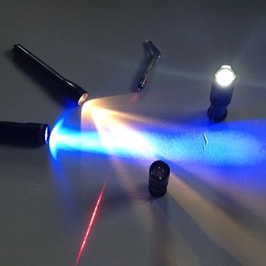
You can see that a factor with an ultra violet flashlight, which is vertical at the left just above, is that the typical UV flashlight also puts out visible violet/blue light, at the right above. Conceptually this is a problem because you're trying to demonstrate something that is not self-evident but it does provide an opportunity to give the child an optical filter that will dampen the ultraviolet while still letting the visible light pass.
The infrared flashlight in the top left picture is showing only three faint reddish lights. Watch the video. |
|
|
|
|
A cat toy laser is inexpensive and widely available. The point of it is that it gives the child a coherent beam of light which is especially useful in combination with mirrors, lenses and fibers. It makes the point that Light sometimes behaves like a particle. The white light is used to generate spectra and shadows and to illustrate that light spreads out like a wave. The Red Green Blue LED beams are used to mix colors. The infrared light shows the spectrum just below what we can see. It is also the juncture between Light and Heat as everything radiates heat in infrared. Ultraviolet is used to show its capacity to change things. Think sunburn.
|
|
|
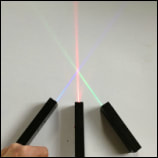
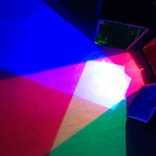
Use Red, Green and Blue LEDs to show color mixing and separation.
These are the Additive Primary colors. So you would give the child a picture like the one at the right. Use a camera to produce simple schematics.
Give the child a picture, the light sources and say....make this....and then do it one time as the teaching demonstration.
These are the Additive Primary colors. So you would give the child a picture like the one at the right. Use a camera to produce simple schematics.
Give the child a picture, the light sources and say....make this....and then do it one time as the teaching demonstration.
|
Use a cat toy laser to provide coherent light. This is another invisible reality and one that can be made sensible with a basic Practical Life tool, a misting bottle, which relates directly to Plants. |
|
|
|
A light stage is the equivalent of a work mat with the added feature that the child can project images on it. One way to do it is a tri-fold presentation board and an erasable white board for the floor. The white board let's you mark where a lens, light, disk or mirror might start. But you're also going to want to use a wall or a ceiling. So keep an open mind about the use of a stage.
|